Truck
Start the engine, choose how the truck shifts, use the cab controls and the radio, and look after the truck and driver.
Draft copyStart and drive
Walk to the door and use Enter the truck.
Start the engine with the Ignition switch, or press Ignition.
Ignition:Keyboard and mouseIXbox controllerLBARelease the Parking brake.
With an Automatic gearbox, the brake also reverses. The Start the truck tutorial hint labels it Brake/Reverse.
If something is missing, the game reminds you:
- Start the engine before moving.
- Release the parking brake before moving.
- Select a gear before accelerating.
- Hold the clutch while changing gear.
- Shift up to lower the engine revs.
The gauges show speed in km/h, engine speed in RPM x100 and the current gear. See Gauges.
To get out, use Exit in the cab or press Exit Vehicle. You cannot get out while the truck moves, in some places, or during a CB call:
- You can't exit while the truck is moving!
- You can't exit here.
- Wait for the call to end before leaving the cab
Default keys from the PC presets
Scroll horizontally to see all columns.
| Action | Keyboard and mouse | Xbox controller |
|---|---|---|
| Ignition | I | LBA |
| Parking Brake | Space Bar | D-pad Up |
| Accelerate | W | RT |
| Brake | S | LT |
| Steer Left | A | Not bound |
| Steer Right | D | Not bound |
| Steer Axis | Not bound | Left Stick |
| Interact | Left Mouse Button or E | A |
| Exit Vehicle | F | Y |
Gearbox and clutch
On PC, you choose a gearbox type in the controls setup. To change it later, open Settings › Gameplay › Gearbox Mode.
- Automatic shifts for you. Use the throttle to move forward and the brake to reverse or stop.
- Semi-Automatic lets you choose the direction yourself. The gearbox then shifts for you, and the throttle accelerates.
- Manual leaves the gears to you. Select each gear yourself and use the throttle to accelerate.
A manual gearbox has two more options:
- Clutch Mode is Automatic Clutch, where the game works the clutch for you, or Manual Clutch, where you work the clutch yourself when you change gear.
- Shifter Type is Gear Up/Gear Down, which shifts one gear up or down, or H-pattern, which copies the layout of a traditional manual gearbox.
With Manual Clutch, hold Clutch while you change gear, then release it. If you forget, the game shows Hold the clutch while changing gear.
The truck has a 10-speed gearbox. Under Direct Gear Selection, the controls are Shift Gear Up, Shift Gear Down, Gear 1 to Gear 6, Reverse Gear, Range Toggle and Splitter Toggle. Only the two shift controls have default keys.
Settings › Controls › Range/Splitter Mode sets how the two toggles work. In BUTTON mode, each press toggles the state. In SWITCH mode, the state stays set until you change it. The game does not describe the range and the splitter further yet.
Default keys from the PC presets
Scroll horizontally to see all columns.
| Action | Keyboard and mouse | Xbox controller |
|---|---|---|
| Shift Gear Up | Left Shift | B |
| Shift Gear Down | Left Ctrl | X |
| Clutch | Not bound | Not bound |
| Range Toggle | Not bound | Not bound |
| Splitter Toggle | Not bound | Not bound |
Cab controls
In the cab you can use Ignition, Parking brake, Engine brake, Lights, Hazard light, Wipers, Radio, CB Radio, Seat setup and Information boards. Some trucks label the hazard switch Hazard lights.
The headlights, turn signals and hazard lights also have keys, listed in the table below. The tutorial hint calls the turn signals Indicators. For automatic headlights, turn on Settings › Gameplay › Automatic Headlights.
The truck radio plays music stations. Use Radio in the cab or press Vehicle Radio. The game shows the station name when you change station, and Radio off when you switch the radio off.
To manage favourite stations or add your own, open Settings › Gameplay › Radio Stations. See Radio stations. To change the radio volume, use Settings › Audio › Radio Music Volume.
The controls also include Horn, Cruise Control, Retarder, Jake Brake and Differential Lock. The game does not describe what these do yet.
Default keys from the PC presets
Scroll horizontally to see all columns.
| Action | Keyboard and mouse | Xbox controller |
|---|---|---|
| Lights | L | LBB |
| Hazard Lights | / | LBY |
| Left Turn Signal | , | D-pad Left |
| Right Turn Signal | . | D-pad Right |
| Wipers | P | Not bound |
| Horn | H | Left Stick Button |
| Vehicle Radio | R | LBX |
| CB Radio | X | D-pad Down |
Camera, seat and mirrors
Press Change View to cycle the cameras. The pre-made views include View Center Steering Wheel, View Centre Dashboard, View Left A-Pillar and View Right A-Pillar.
Rotate Camera Left and Rotate Camera Right rotate the camera. With Mouse steering, hold Free Look (Mouse Steering) to rotate it.
The controls also include Quick View Left and Quick View Right. The game does not describe the quick views yet.
Open the seat and mirror screen with Seat setup in the cab or Mirror & Seat Settings.
Mirror & Seat Settings:Keyboard and mouseOAdjust the seat or a mirror.
Confirm with ACCEPT, or use RESTORE DEFAULTS.
Default keys from the PC presets
Scroll horizontally to see all columns.
| Action | Keyboard and mouse | Xbox controller |
|---|---|---|
| Change View | C | Right Stick Button |
| View Center Steering Wheel | Num 5 | Not bound |
| View Centre Dashboard | Num 8 | Not bound |
| View Left A-Pillar | Num 7 | Not bound |
| View Right A-Pillar | Num 9 | Not bound |
| Quick View Left | Num 1 | LBRight Stick Left |
| Quick View Right | Num 3 | LBRight Stick Right |
| Rotate Camera Left | Num / | Not bound |
| Rotate Camera Right | Num * | Not bound |
| Free Look (Mouse Steering) | Right Mouse Button | Not bound |
| Mirror & Seat Settings | O | Not bound |
Settings › Gameplay has related options: Automatic Camera Pan, Camera Sensitivity, Steering Wheel Visibility and HUD Visibility.
Settings › Gameplay also has Invert Camera Y-Axis.
Truck condition and rest
Press Toggle Info Panel to show the info board. It lists the condition of the truck's parts: Engine, Transmission, Brakes, Suspension, Tyres, Oil & Filters and Cabin. It also shows job details: Cargo, Cargo Damage, Expected and Job income. See Info panel.
With Truck Damage on, crashes and wear damage the truck. To repair it, drive to a workshop.
If the truck needs help on the road, the game tells you to use Roadside Assistance on the CB radio, then Restore and Repair. CB radio lists the assistance options.
To rest, use Rest at a hotel or in the office at your base. At your base, rest is free. See Your base and office.
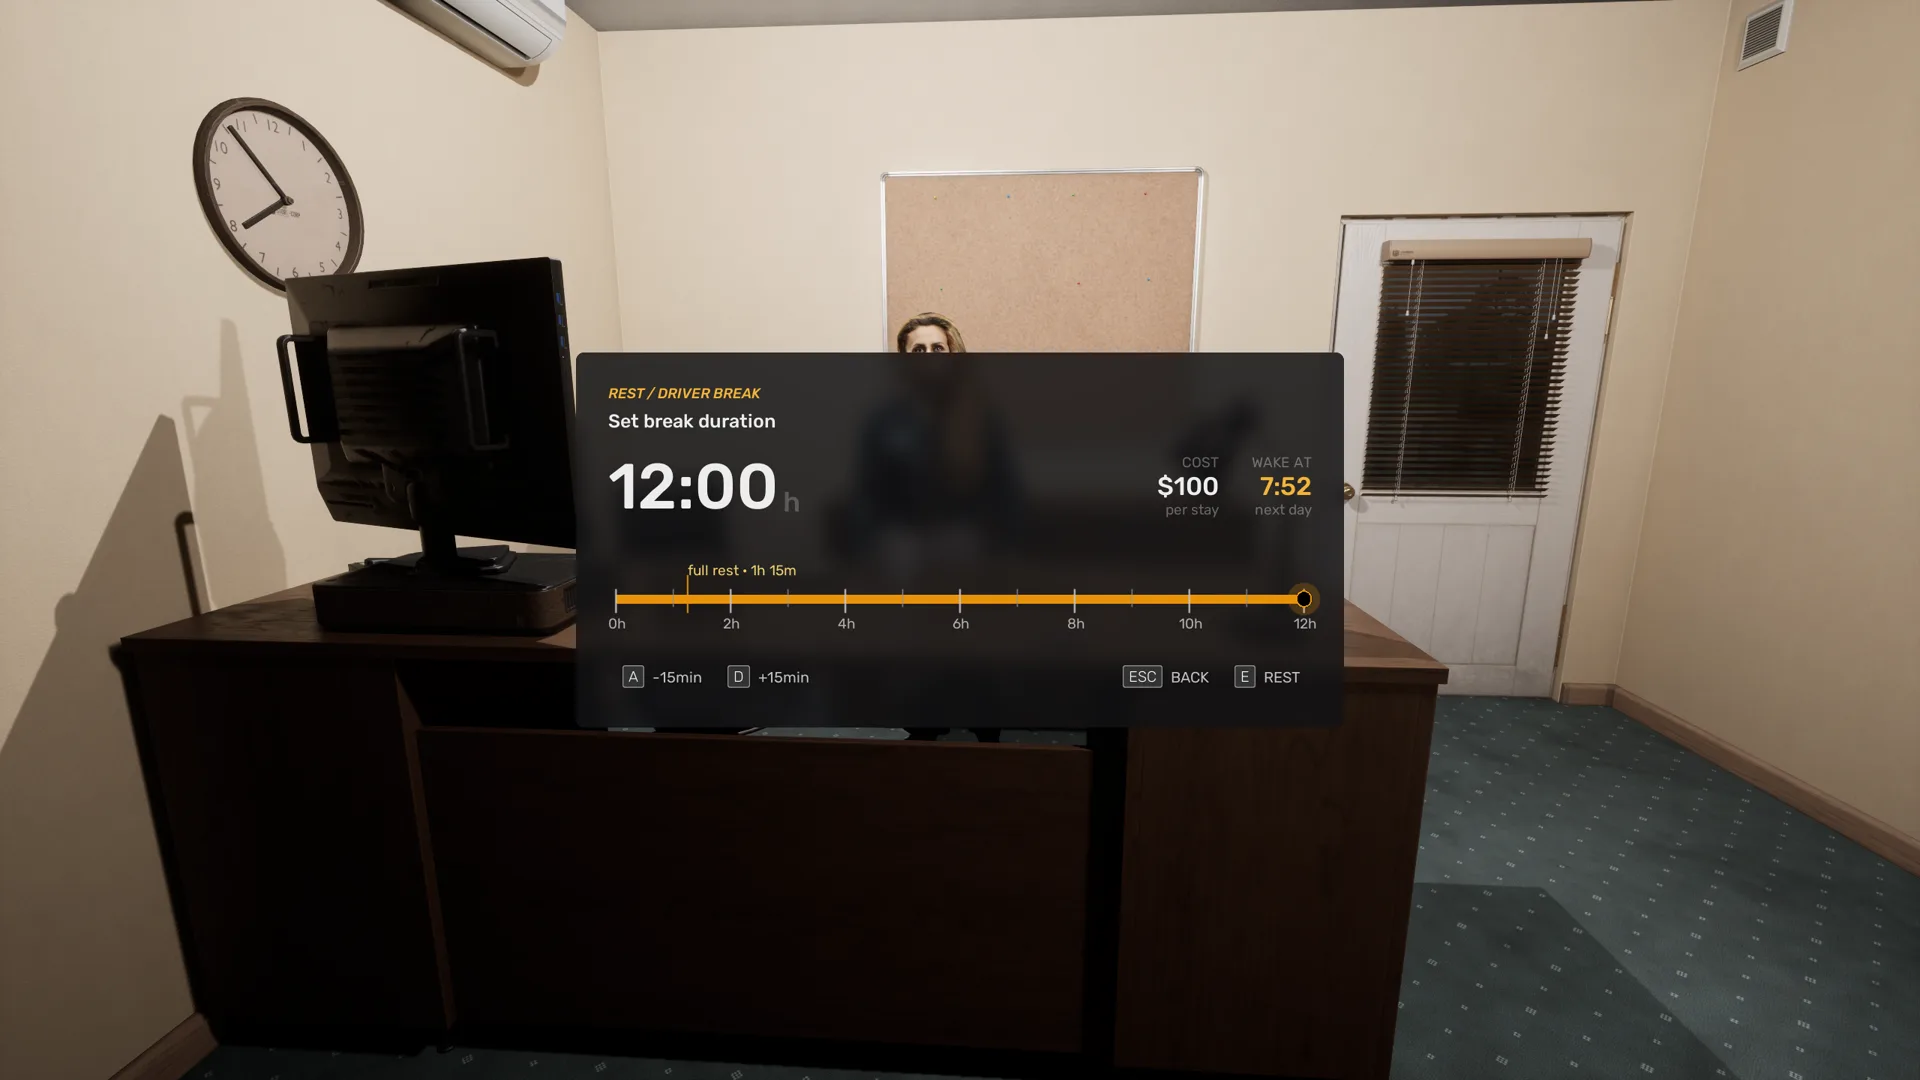
On the REST / DRIVER BREAK screen, under Set break duration, set the break with +15min and -15min.
The full rest mark on the slider shows how long a full rest takes.
Check WAKE AT and COST.
WAKE AT shows when you wake, on the same day or the next day. COST shows the price per stay, or FREE and no charge when the stay costs nothing.
Press REST to confirm, or BACK to cancel.
You can also Report a one-hour break to Base over the CB radio. See Calls to Base.
Settings › Gameplay › Fatigue turns the driver fatigue system on or off. The game does not describe the fatigue system further yet.
Default keys from the PC presets
Scroll horizontally to see all columns.
| Action | Keyboard and mouse | Xbox controller |
|---|---|---|
| Toggle Info Panel | Tab | RBD-pad Up |
| CB Radio | X | D-pad Down |
Workshop
At a workshop you can repair, service and wash the truck. Workshops are marked Workshop on the map and the minimap. See Map and minimap markers.
Park the truck inside the workshop.
Use the Workshop prompt to open the workshop screen.
If the truck is not inside, the game says No truck in the workshop.
Choose repair or service, then select what you want. Each item shows its price.
Default keys from the PC presets
Scroll horizontally to see all columns.
| Action | Keyboard and mouse | Xbox controller |
|---|---|---|
| Interact | Left Mouse Button or E | A |
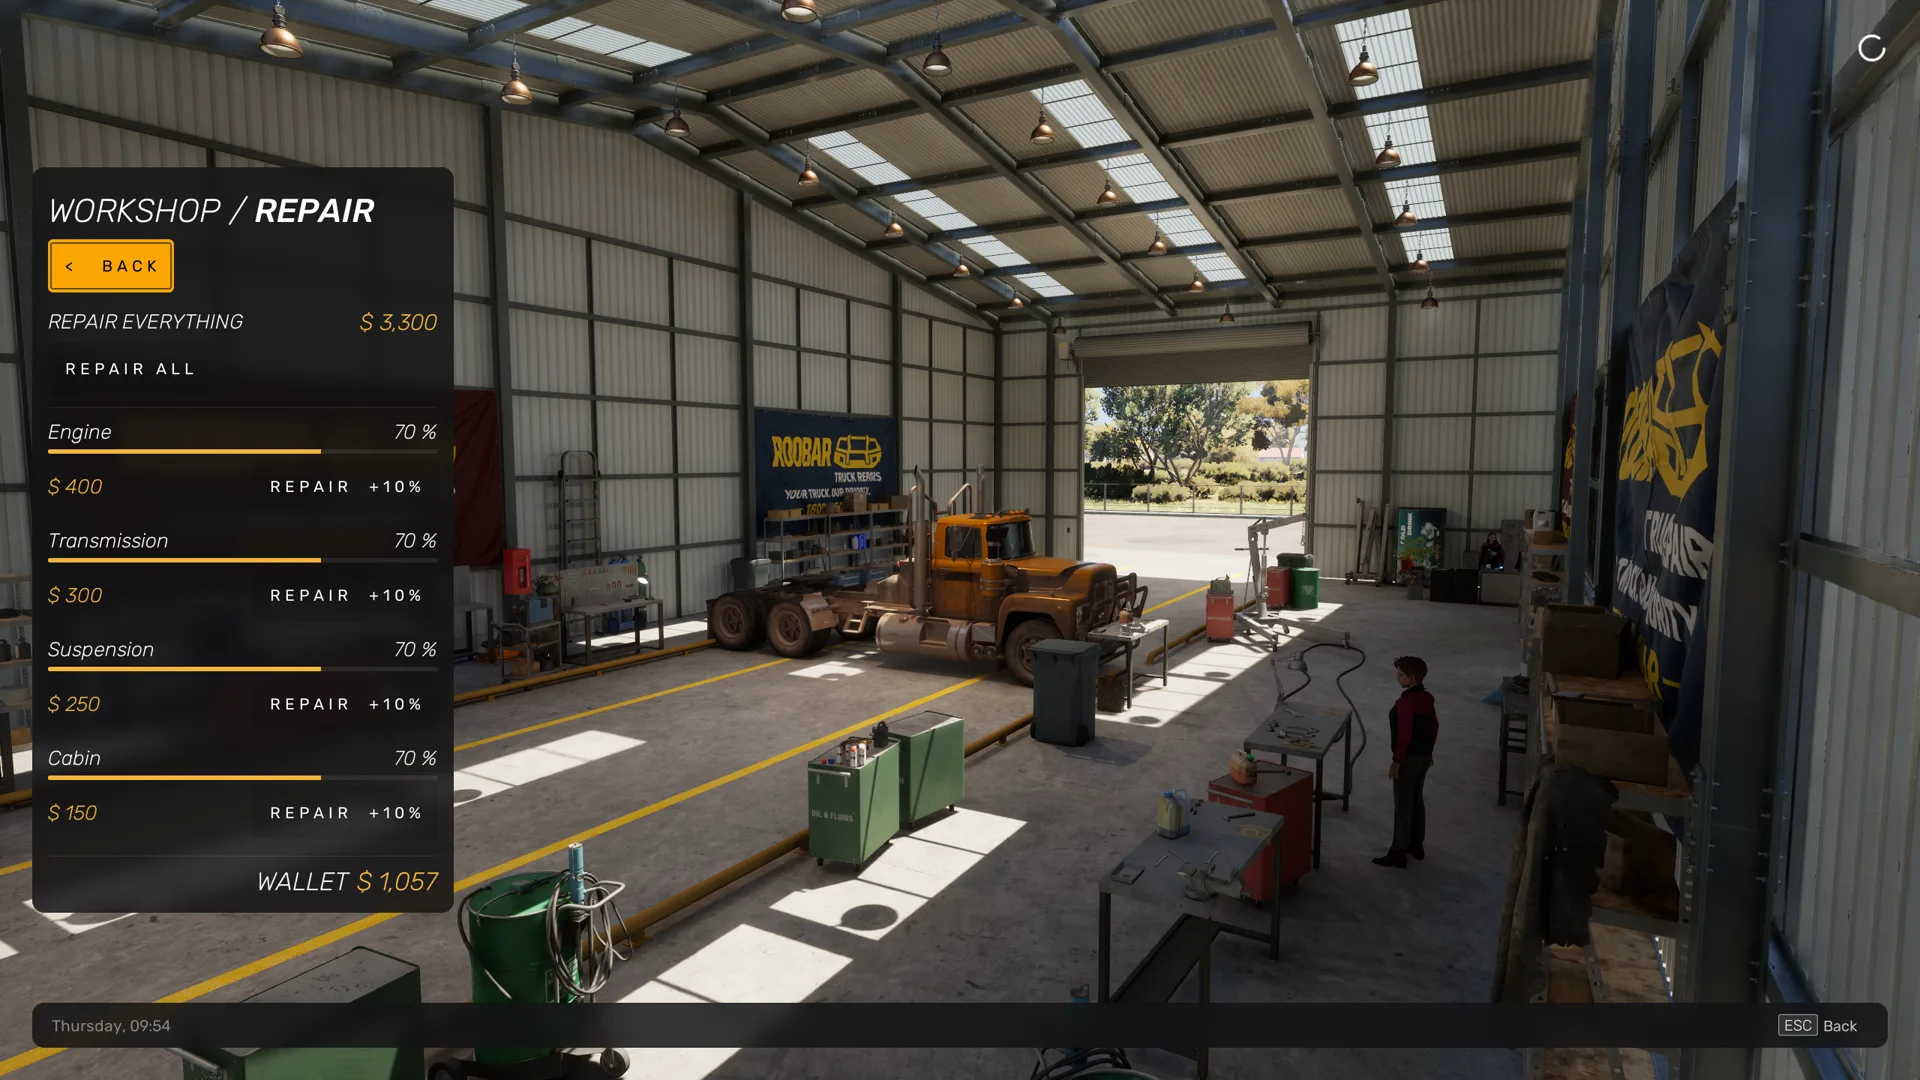
Repair lists the Engine, Transmission, Suspension and Cabin, each with its condition and a price. You can repair one part at a time or everything at once.
Service lists Brakes, Oil & Filters and tyres, each in budget, standard and premium grades. The game does not describe the difference between the grades yet. Service also has a full wash.
WALLET shows your money. Modifications are on the screen too, but you cannot select them yet.